Home Home Home Contact Me About Me Facebook Twitter Teachers Pay Teachers Pinterest Bloglovin Email Me
Showing posts with label engagement. Show all posts

Monday, June 24, 2019

Task Cards - A Fantastic Resource at the Secondary Level

The first time I heard the term "Task Cards" I thought they were index cards that gave students directions for a task.  I wondered why teachers couldn't just tell students the directions verbally...  As time went on, I heard the term more and more but still never saw a concrete example of what they were.  So, I did what all curious people do - I Googled it!  While that gave me some clue, it was still not a definitive reason as to why I should pursue their use in my high school classroom.  I mean, let me be honest here - high school is overrun (like all grade levels are) with standardized testing, CCSS, and forty-seven things you must accomplish every day.  I had no time to add something new. 

Then I looked at my students and saw that something just wasn't working in my day-to-day structure.  So, I started looking for ways to better address student needs and learning levels WITHOUT adding extra work to myself.  While there were multiple options, I kept coming back to Task Cards as a viable solution.  After I tried them a couple of times, I saw some amazing results.  Students were picking up on concepts that they had struggled with, discussion in class had students participating that I had rarely heard from and most importantly, grades were rising.

So, let's talk about Task Cards!

1)  What is a Task Card?  
A task card is a card, piece of paper, piece of card stock (basically whatever works best for you) that features one problem, question or work task. (I prefer printed on cardstock and then laminated to save on costs).


Beginning Concepts Task Cards
Why only one problem/question?  I questioned this at first too, but found that it helps the students focus on just one problem, idea or skill at a time without getting overwhelmed.  It is easier for students to see on problem at a time instead of facing "I have 15 problems to complete and I can't even get number one done".  

(Most task cards can be created to be four to a page that you then cut apart into individual problems like the ones at the left).


2)  How do you use a task card?  
There are so many ways to use a task card.  A few are:
Congruent Triangles
      a)  Pair students with a partner and have them pass the cards from pair to pair every 2 minutes.
       b)  Separate the cards by concepts/difficulty and have students work in small groups depending on
             their abilities.
       c)  Use the cards as part of a larger station activity.
       d)  Have students complete one (or two) as an exit card to test for understanding
       e)  As a warm - up or bellwork assignment
       f)  Laminate a set and post them around the room for students to rotate around.  This is great for students who need/want to be up and moving around.
  
3)  How do task cards allow you to differentiate?  
Since task cards feature only one problem you can write the problems to be at individual levels.  For example, when I teach Segment Addition I can use a variety of cards.  I can use some that are just simple adding and subtracting, some that feature algebra in a one or two step equation or some that are a challenge where the problems are multi-step with variables on both sides of the equation. 

This is an example of four different levels of task cards that I use when doing the Segment Addition Postulate. It allows me to differentiate by giving students cards that are at their individual level and still assess all student understanding of the same concept!  It has been a real lifesaver!


Coordinate Distance and Midpoint
4)  How do I create a Task Card?  
The first step is to decide how many cards you want per page.  I find that four works well since it gives room to create the problem and is neither too big as to waste paper nor too small as to make it hard to read the problem/question.  You want to have a clear idea of the different levels of the concept as well as to how you want to phrase the questions being asked.  I find that laying it out first makes it easier to create them.  Once you have decided on a layout and the different levels of questions, you can start creating.  I will admit, creating task cards is a time-consuming process but once they are created, they are done!  (I find using PowerPoint the best program if your task cards require layering like mine do!)


5)  How I best utilize my resources and save myself time?  
I recommend printing your task cards on card stock, laminating and then cutting them out.  Unless you really find it necessary for students to be able to write on the cards, there is no reason to recreate the wheel every hour and print them on paper.  Additionally, if you print them on card stock and laminate them, then students can write on the cards using dry erase markers and then "erase" when they are done without damaging the card !  
Similar Triangles

I always make sure to include an answer sheet with mine for students to hand-in when they are done.  This allows me to hold them accountable and again saves on the need to continually reprint the task cards. 


All in all, I have yet to find any drawback to using task cards!  I highly recommend trying them out.  If you are a Geometry teacher, like myself, and want to try them before dedicating large pockets of time to creating them, I recommend shopping on TeachersPayTeachers.  I have the multiple sets illustrated above individually and in a money saving bundle in my store (with many more on the way!) but a search will turn up task cards on many, many topics! 


Monday, July 18, 2016

Interactive Notebooks - The Perfect Combination of Lecture and Handout Notes!


Lecture notes = stand and deliver in many minds.  Guided (fill-in-the-blank) notes = spoon feeding in other minds.  Neither one is better or worse than the other.  Instead they are structured to meet your students at the place that they are at.  The reality is, though, that in a class of 28 - 35 no one is at the same place.  So how do you meet them where they are at while retaining the flow of the class?  This is a struggle that I have had for the better part of 20 years through a 7 - period day, 6 - period day, trimesters, semesters, block and probably more that I cannot remember!  In addition, we have tried to be more "green" and "paperless" in my district as well which further adds to the struggle when you are trying to not make multi-page handouts that will just be (hopefully) recycled at the end of the semester.  So this year, I am trying  going to pilot something different in one of my classes - Interactive Notebooks - that I think will be the "perfect" marriage between the two methods!  I wanted to share with you why and how I'm going to go about it!


Cut and Paste
1)  Interactive Notebooks help students to stay organized helps them to reference back to old material.  One of my biggest frustrations is when students are trying to find something in a folder that is jam-packed with old assignments, notes, handouts and 1,000 other pieces of paper.  While it is fantastic that they are keeping all of these things, they serve no purpose if they can't find anything in them!  By using an interactive notebook students have all of their notes, IN ORDER, and can actually find them when they need them.  Some teachers also have students number the pages and keep a table of contents (which makes so much sense) so that they know exactly where the material is.  This is a fantastic thing, especially at the secondary level when material spirals and keeps building upon each other.  Although I did not use INB this year, I had a couple of my honor's students
FREE!!!
bring out their INB from the previous year (yes they kept them!) to look up previous ideas!

2)  Interactive Notebooks help to hold students accountable for and engage them in their own learning.  With many of guided notes, I find that a few of my students literally only fill-in-the blanks and don't write anything else down.  While this is by far a slim percentage of my students, as a teacher I want to reach them all.  I asked my students why this was and the common response was
that they don't know how to take notes and that they write slow (especially if the blanks are words that they are not familiar with).   INBs allow teachers to go more in-depth and help students to focus in on small pieces of information which leads to students writing more down.  Students also seem to feel more ownership because they can annotate easier and add things around the page.  


Angles of Elevation and Depression
3)  Interactive Notebooks should save paper, resources and time.  Since the interactive notebook pages are smaller and many less pages than traditional notes it should save on both paper and copy machine resources.  Most INB pages can be printed two to a page or are tabs that you can paste into the regular notebook and write under, both of which will save on paper.  Fewer copies means less time at the copy machine which means more time for everything else!  Additionally, since INB pages tend to be shorter, it will be easier to go over them more in-depth with absent students instead of having to wait for them to copy down multiple pages of notes from other students first.  Instead you can create an Interactive Notebook of your own that can act as a key.  This way  absent students can just borrow yours to fill in theirs and you can copy just one or two pages of your notebook if you need to send something home instead of multiple pages.

Similar Triangles Cut and Paste
4)  Interactive Notebooks meet students where they are at.  Interactive notebooks allow students to pick their pace.  If they need more examples, they can write them on the notebook page around the INB paste in.  Or if they want to explain how different ideas tie together, they can write the page number of the related page on the INB page and have quick reference.  Additionally, for those students who have accommodations, INB pages are easily differentiated to meet their needs.  I have even found that when surveyed, my honor's level kids liked the idea.  They stated that sometimes it is nice to have the diagrams done so that they can go further and explore the ideas more in-depth instead of getting bogged down with drawing everything.

Congruent Triangles Cut and Paste
I am going to try out Interactive Notebooks in one or two of my classes for the first couple weeks of school and do traditional guided notes in my other.  After a couple of weeks, I will let my students chose which one they like better.  I suspect it is going to the Interactive Notebooks.  I'll keep you posted!   Click here to get my Interactive Notebook pages on Angles Formed by Parallel Lines for free!   I would love to hear how you use Interactive Notebooks in your classes!  Please share below!  

Wednesday, June 8, 2016

Activities to Encourage Collaboration #1: Surface Area and Volume of a Sand Castle!

In a time and society where students spend more time communication through text messages, Facebook, Twitter, Instagram and 14 other social media platforms that I cannot even begin to name, I find an ever increasing need to get my students talking to each other fact to face.  As a result I have been on a quest this year to implement as many collaborative activities as I can.   I have used many of them throughout this school year and have had some amazing results that include increased communication, retention of information, assessments grades and more positive attitudes (overall)!   Throughout the summer I will be sharing some of my favorites, some of my other favorite math teacher-authors and many others so that hopefully they can become your favorites too!

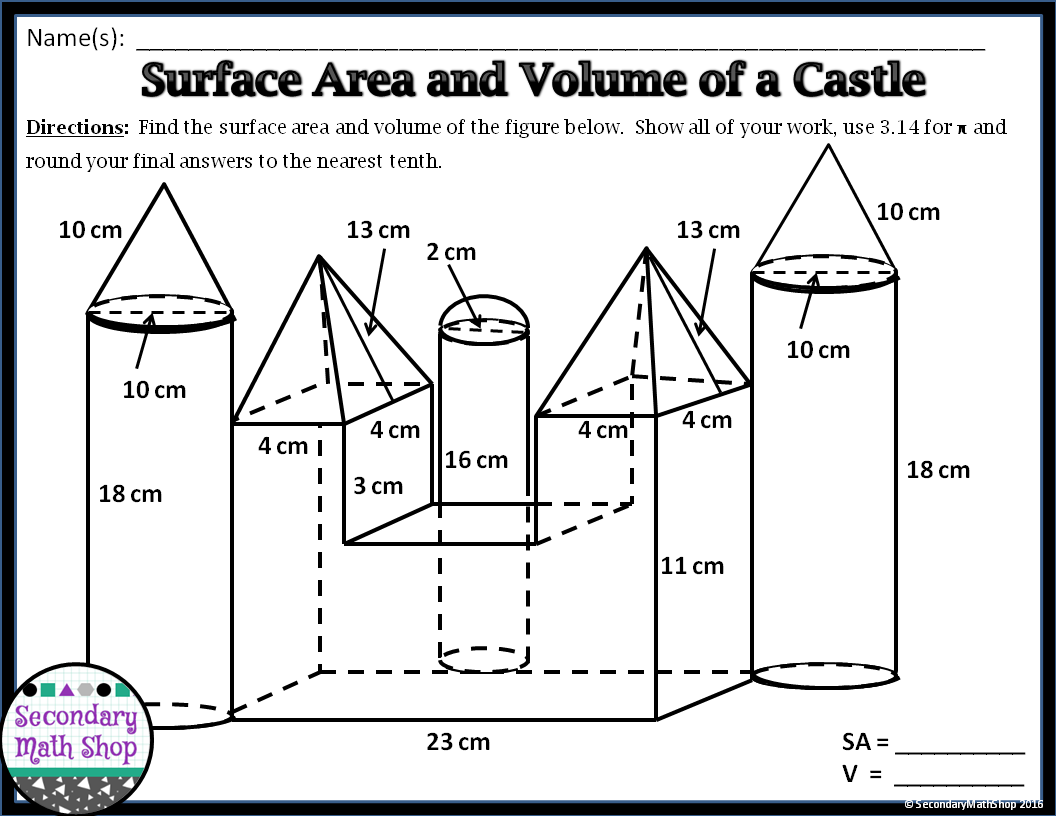
Today I am excited to share with you my Surface Area and Volume of a Sand Castle activity!  As we were finishing our three-dimensional figures unit in Geometry I was looking for a really good way to a) get the students talking and b) show them how the different figures can share dimensions to build the structures that we see on a daily basis.  Since I do not possess architectural skills and summer is upon us I decided to build a Sand Castle (as "Do You Want To Build A Snowman" is running through my head).  I started with a goal of including as
many of the main solids that I could and managed to include prisms, cylinders, cones, pyramids and even a hemisphere!  I worked to have the solids share bases, sides and dimensions whenever possible.  This is what I came up with!            
I also came up with a second version that has the figure divided into 11 smaller figures to help struggling students visualize a path to follow to solve it.  Additionally, this helps students to organize their work so that you and they can identify an error if they make one.  (I did not, however, hand this out to begin with as I wanted to see what they would do with it first!)


Before implementing this as partner/group collaboration piece I sat down and created a list of questions that I could ask as I walked around the room to point students in the right direction, get them thinking, communicating and solving without actually giving them the answer.  Some of the questions that I came up with:

1)  Are there any surfaces that aren't exposed?  Alternatively - are there any surfaces that shouldn't be used in surface area?

2)  Have you thought about breaking any of the larger figures into smaller ones?

3)  How are you arranging your work so that you can go back and check it later?

4)  Are there any dimensions that you don't have?  How can you find them?

5)  Do the unused surfaces from the surface area get used for volume?


FREE!!!! 
Finally the day arrived to implement this and I must say, it went AMAZINGLY!  After my students got over the expected moans and groans and sat down to start working on it, they had fun with it.  I heard great discussion, collaboration and genuinely helping each other understand instead of just giving each other the answer.  I set forth the "rule" that their final answers had to be within ten of mine (to account for rounding error) and that whoever was the closest won a prize (extra credit, candy, excusing of an assignment, ect.).  My students quickly turned it into a competition and worked hard to earn the prize.  I ended up with multiple students hitting my answer down to almost the decimal point - which is great! :)  Based on the feedback I can honestly say that they enjoyed it and felt that it really reinforced the concepts we have been learning in this unit!  

I have put the entire activity, including a multi-page answer key that highlights each piece and how to find their surface area and volume up in my teacherspayteachers store.  You can pick it for FREE here :)  I would LOVE to hear how you use it and implement it! Please comment below!

Friday, April 8, 2016

Math Misconception: The Final Answer is The Only Part That Matters

For the longest time, I really thought that getting the right answer was the goal and really the only thing that mattered.  This misconception stuck with me all the way through elementary, middle and high school and was really not challenged until college.  Through my K-12 experience I showed my work because I could not do the math without it. However, there was no reward for it.  There was not partial credit, it was all about the correct answer.  As a struggling math student (to the point where I actually started looking into careers that did not involve math) this really frustrated me because I was often unable to find the correct answer.  (Especially in Geometry when writing proofs - ugh!)
It was not until I took College Algebra my freshman year of college that the work behind the problem became just as important, if not more so, than the correct answer.  It was also, at that point, that math "clicked".  The emphasis on showing my work helped me to the understand, make connections, and to truly appreciate the beauty of mathematics.  Moreover, it also cemented my career path - to become a high school math teacher - who knew!  Now as a teacher, here is what I explain, emphasize and illustrate to my students about why the final answer is not always the best answer to the problem.

1)  Showing your work helps you to understand the "why" the answer is correct.  My favorite question to ask my student whenever they give me an answer during a class discussion, during group work or even individual practice as I am walking around assisting them is "why".  Why did you choose that formula, why did you draw that diagram,or why did you did set-up that equation?  If my students can't answer why, I will help them out with leading questions or allow other students to do so (depending on the circumstance).  I tell them upfront on day one, if you can't tell me "why" then I am going to keep asking.  Sometimes it makes them laugh, but as I am consistent with making all students answer it, it also helps them to make it to reason two.

2)  Showing your work helps you to understand the connections between  different topics within a class and different branches of math .  We as teachers, parents and adults, all know that math is circular in its connections to each other.  When I teach parallel lines, for example, I review and apply the properties of angles that we study in our foundations chapter, setting up and solving algebraic equations that they learned in a previous class as well as the idea of determining whether or not their final answer in reasonable.  If a student is not showing their work, they are not able to see these connections in action.  They are not able to see how the math keeps "coming back".  As the year goes on, these connections get even deeper.  By the time I teacher my final unit - Three-dimensional figures - we are tying together area, linear equations, squares and square roots, triangles and at least four other topics!  So often, I hear students say - wait, didn't we do x or y before and can't we use w and z here?  The more we stress showing their work, being able to answer "why" and "where" the answer came from, the more we can move students to the most important reason I see for looking beyond just the final answer.  

3)  Showing your work helps you to retain the knowledge beyond just a quiz, test or other assessment.  As much as we don't like it, standardized testing is a reality of this world that we live in.  My students are gearing up for this in the new few weeks.  Having done multiple types of practice with them through the year, I know how much inter-connection of topics and how much prior knowledge they need to retain.  But it goes beyond that, beyond a single test (normally) during their junior year of high school.  It goes on to a better attitude about math and a better appreciation how much impact math has the world around us.  I seriously cannot count the number of times that I hear "I hate math" , "ugh, math was my worst subject" or "I never use math" when people find out that I am a math teacher.  For those that I am lucky enough to continue the conversation with, the reason often comes out that they never truly understood why they had to do it or how it all worked.   

While I definitely don't have all the answers, I do think that they more we can emphasize showing how you do the math, understanding why you need to do it and how the different ideas work together we are setting our students up for better performance on tests, in college, in their career paths and more.  Yes, the final answer matters - we need to balance our checkbooks, we need to buy the right amount of paint or carpet - but we also need to know how to consistently arrive it!  

Sunday, April 3, 2016

Celebrate Spring and Customer Appreciation

Spring is my favorite season.  It is time of renewal, regrowth and new adventures!  Unfortunately for me and many teachers I know, it is also the start of the stress of state/national test season. :(  In this time of high stress I want to help you all out and to say thank you for your continued support of my TpT store!  I have chosen five of my products that are in high demand at this time of year and am going to offer one per day throughout this week at an additional 25% off!  Additionally, I am running a rafflecopter that will start on Monday, 4/4 and run through midnight on Friday 4/8 of my geometry riddle worksheets bundle and my algebra riddle worksheets bundle!

On Monday (4/4) my Graphic Organizers Entire Year Bundle will be an extra 25% off of the already money saving bundle price!  These Graphic Organizers are great for helping students review for finals as you finish out the year as well as useful through the year as you teach your Geometry Units! 

On Tuesday (4/5) my 2nd Semester Geometry Bellwork Bundle will be an extra 25% off of the already money saving bundle price!  My bellwork are not only great for getting classes started, but also work well as station cards and exit tickets!

On Wednesday (4/6) my 2nd Semester Geometry Word Wall Cards/Posters will be an extra 25% off of the already money saving bundle price!  This posters not only look beautiful on your walls but helps students reinforce their Geometry vocabulary and stimulate mathematical discussions!  


On Thursday (4/7) my  (Geometry) Circles Complete Unit Bundle will be an extra 25% off of the already money saving bundle price!  This bundle includes notes, bellwork, practice worksheets, review, graphic organizers and more!  

On Friday (4/8) my  2nd Semester Complete Curriculum Bundle will be extra 25% off of the already money saving bundle price!  This bundle includes 5 units that are most often taught during the second semester - Right Triangles, Quadrilaterals, Circles, Area and Three-Dimensional figures!

Don't forget throughout the entire week to enter into my rafflecopter Double Riddle Worksheet Bundle Giveaway - both my Geometry Riddles Bundle and my Algebra Riddles Bundle!


I hope that these savings will help you out as you plan out the finish to your year!
a Rafflecopter giveaway


Tuesday, January 5, 2016

Why I Believe You Should Decorate Your Secondary Classroom (and How To Do It!)

When I first started teaching 15 years ago, I was the only female in my department and the youngest teacher to boot! Needless to say I stuck out from the rest of my department (cue the song "one of these things is not like the other...). When I made the decision to decorate my classroom it made the difference even more obvious. However, looking around my very empty, bare, beige, cinder-block classroom I felt it was very cold, very sterile and just not that welcoming so I HAD to decorate. The big question, though, was how and with what? I had no clue how to decorate a secondary classroom so that it look like a high school classroom and not an elementary one. I had no idea how to get things to stay on the walls, where to find supplies or even a vision of what I wanted to look like! I just knew that I had to do something...

It was that last part - lack of vision - that led to many mistakes and wasted money (and as a beginning teacher money is definitely not something you have a lot of)! Finally, though, after 15 years I have finally feel like I have an under control, inviting, warm, educational and cohesive design! I would like to share a few tips with you to help you avoid the follies that I made my first few years!

1) Plan the space out before you begin. All classroom are traditionally either rectangular or square in design but you don't have all of that space to work with. If your room is anything like mine you have cupboards, heating vents, boards on a certain wall, bulletin boards, computer drops and of course 33 desks! Free space is a premium and you need to use it wise. You don't want to go out and get a bunch of things and then have no wall space to display them or floor space to put them. Before I started my current classroom "decor" I laid out on paper all of the thing that I had to have that I had no control over. For example, based on where the drops were, I had to
have my computer and teacher desk in the front corner. I have a huge air-conditioner/heater that sticks out 2 feet and takes up a third of one of my walls - but it is right under a window so I couldn't have used that wall space anyway. By laying out everything that I HAD to have, I was able to recognize what space I had to work with and could move on to the next step.

2) Place physical objects that take up floor space before posters or other decor. Start by placing your desks, tables, file cabinets that have to be in your room in the place that they need to go. If you want book cases, shelves, a student resource area (i.e. pencils, paper, sharpener, etc.) then they need to go in next. There is nothing more annoying than to put up posters, only to have to move them because a book case, file cabinet, etc. needs to go in that space. Placing everything physical first also allows you to see sight lines and room flow. If you want to post homework, you need to have it in a spot where it is easily accessible and visible versus someplace that it is going to get lost or cause mass congestion.

3) Decide what you want to put on your walls before you buy or make it. Do you want to illustrate your vocabulary (check out my previous post on word walls for ideas if you need them!) and formulas? Do you need to post your objectives and I-cans in a certain place? Do you want to post a list of previous homework or a homework calendar? Do you  want to do some encouragement posters (character, effort and the like?) or words to think about? Do you need to post your rules/expectations? Do you want to leave a space open to display student work?
Do you want to use a lot of different colors or stick to more of theme? Remember, the purpose of putting stuff on your walls is to not only make your room educational and helpful, but also inviting and some place that students feel encouraged and free to learn. Also keep in mind, while you students look at the walls for an hour or so a day, you look at them for 8 hours a day, 5 days a week...

4) Shop smart and frugally. When I first started out buying posters for my classroom I just went to local teacher store and bought what caught my eye. I put tape on the back, hung them up and called it done. It never occurred to me to laminate them to make them last longer, to make them myself or to shop online. Matter of fact, when I first started teaching, the internet barely existed!!! Now, there are so many options. You can go to Amazon and get them in two days for cheaper than the teacher stores offer which is fantastic - depending on what you are looking for that is! I found that while teacher stores were great for the encouragement posters, basic concept and a small portion of middle school math skills that we use at the high school level, they did not cover what we do at the high school level. There just did not exist posters covering the higher level math that I needed. Again, since this was really before the prevalence of the internet I was left with one option - make them myself! And make them myself I did! :) I ended up making over 200 "posters" that are 8.5 by 11! (If you are interested in having them for yourself, check them out in my teacherspayteachers store.) Over time, I have also bought some from other sellers on TpT and finally found a few on Amazon as well! If you choose the route of buying digital and printing them yourself, you can get cardstock pretty inexpensively at your local craft store or some of the big box stores. Also, look into the cost of printing them on your own color printer versus paying an office supply store to do it, often times they are cheaper!

5) Take care of what you have so that it lasts beyond a school year. We live in a green-conscious world and we need to conserve resources so make yours last! While I
know that laminating something and then pitching it is not good for the environment, more often than not, when you laminate a resource, it is because you plan to keep it long term! All of my posters are laminated for two reasons. One because they last longer and two because when I put tape on the back of something that is laminated, it pulls off easily and the poster can be stored easily. I also recommend that you buy a few totes or something else hard plastic to keep them from getting bent or damaged. I tried buying on the poster folders that the local teacher store had, but they were flimsy and unless stored flat, they would eventually curve and curve the posters with them.

My room has evolved a great deal over the last 15 years from a cold, empty, beige (oh way too beige) room to something full of life, color, warmth and that is welcoming! It has been and probably always will be a work in progress but it is also something that I have found enjoyable! I hope that my tips have helped you! I would love to hear what you have done to your room or to answer any questions you might have below in the comments!

Sunday, November 22, 2015

The Effect of Posting Word Walls and Vocabulary at the Secondary Level

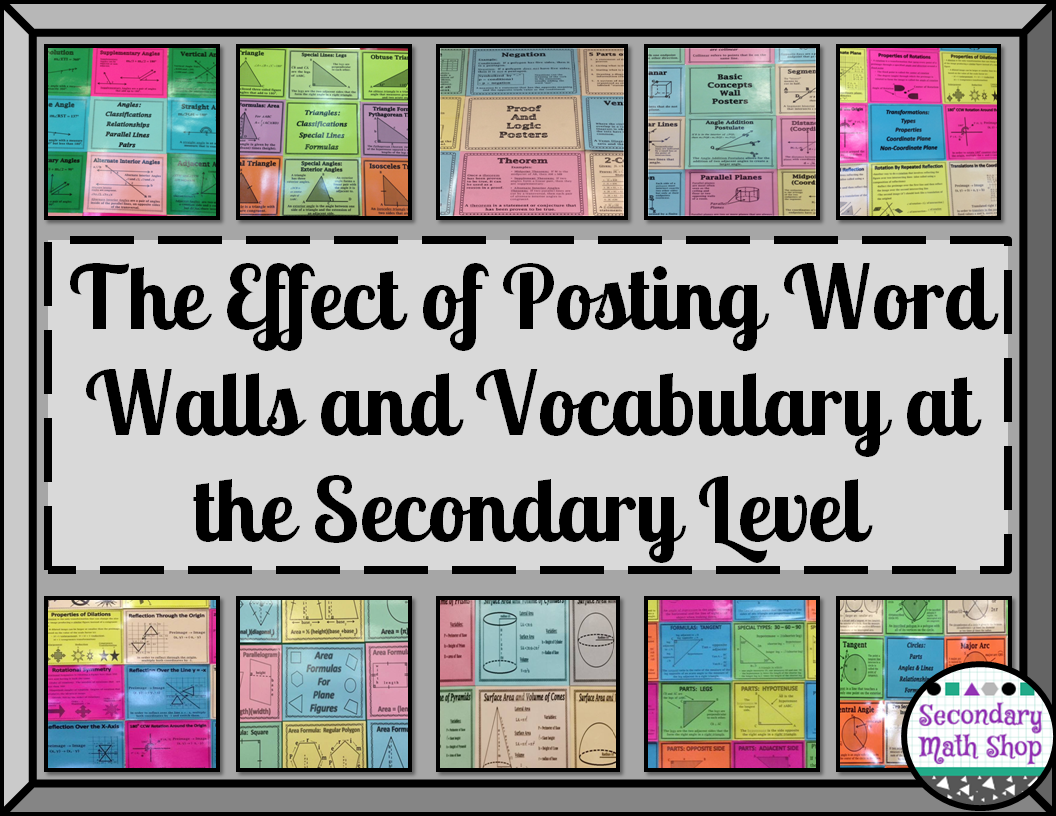
I sat down and did a quick count of the "new" vocabulary that students encounter in Geometry.  If I discount the ones that students 'should' have heard before, I am still left with over 200 crucial terms, formulas and figures that students are expected to master by the end of a school year.  Yep, over 200...in addition to writing English papers, reading literature and history (and all the intricacies that it entails), science, electives and too many other things to list.  I don't know about you, but even just reading that list makes my brain hurt.  In an effort to help my students achieve mastery, I took it upon myself to create word walls of all of the major terms, figures and such.  


 First Semester Bundle
First Semester Bundle

Each entry on my word walls includes the term, its definition, a diagram and/or example and other pertinent facts.  I broke my terms into semesters (first and second) and then further subdivided it into units.  I have found that keep them all up for the course of an entire semester has resulted in some fantastic results.

1)  My students refer back to the walls when they are stuck or don't remember something from a previous unit.  Their frustration level has decreased a great deal because they have a quick reference if they get stuck instead of having to flip through the book, their folders or other reference materials.

Second Semester Bundle
2)  Their ability to explain their thinking has increased dramatically because they have a better grasp of the vocabulary and how the concepts fit together.  For example, when we recently did our congruent triangle proofs, students were more successful because they were able to better remember facts about midpoints, bisectors and isosceles triangles - all of which are posted on the walls.

3)  Students are more focused on the concepts that we are studying because they can see how all the pieces are fitting together and they can see where we are headed.  I open the first week of school by telling the students that what is illustrated on my walls will be what we are studying.  We talk about what they already know and what impressions they have about what they are going to learn.

4)  My room just looks more put together and is a better reflection of high school.  Strange I know, but at the secondary level it is difficult to find decorations that are "older" instead of "elementary".

While it hasn't solved the entire problem of the horrendously long list of things that students today need to remember, it has helped and as teachers, that is one of the best things we can do...help!  


If you want to read more about word walls, my friend over at Scaffolded Math and Science shared their own experience with word walls in this blog post.  They also shared a link with me to their spectacular word wall for Algebra 2 available here.  The description includes "...references for domain, range, increasing and decreasing in interval notation, ... Also included is a quadratic example graph showing the vertex, the equation in vertex form (and how those two relate), domain, range, increasing and decreasing. ... how the x and y at the vertex can show up in domain (in the radical example) and range."


If you are looking for more of an Algebra 1 word wall then check out All Thing Algebra's "Relations & Linear Functions: Word Wall Cards + Template".  Not only does it include the terms "coordinate plane, quadrants, origin, ordered pair, relation, domain, range, mapping, discrete graph, continuous graph, function, function notation, vertical line test, zeros, slope, slope formula, zero slope, undefined slope, positive slope, negative slope, slope-intercept form, standard form, x- and y-intercepts, horizontal line, vertical line, parallel lines, and perpendicular lines" but it also includes a bonus template to create your own.  


If your needs fall into the middle level then check out Lindsay Perro's "Middle School Math Vocabulary Cards  "The product includes "120+ Common Core related vocabulary words. Each page includes three cards - one with the word, another with the definition and another with an example. Use together on a word wall or as a matching activity to help students learn the words that are critical to common core success in middle school! These cards would work great as a math center in your classroom! Included are both color and black and white versions. Also included are templates in PowerPoint so you can add your own words!"


To the Square Inch- Kate Bing Coners has taken the idea of math word walls one step further and not only offers them in English but in Spanish too!  Both sets feature "Common Core based word wall words with illustrations with super bright colored backgrounds."   The Spanish ones are "Perfect for bilingual classrooms, ELL classes, Spanish math classes or supporting your English Language Learners."  I encourage you to check them out!  I know I will be :) 


I would love to know how you use word wall cards.  Comment below and I'll chose one lucky commenter to receive their choice of one of my twelve sets of word wall posters!!!  

Saturday, October 24, 2015

Avoiding the Pitfalls of Teaching 2 - Breaking Away From the Book's Sequencing

      As we move forward in our teaching career we look back on the past and say "if I had only known then what I know now..." and have a hundred things to fill in the blank with.  While there are many things that I wish I could have a do-over on, it is what I have identified as pitfall number 2 that bothers me the most.  It is simply this:  I wish that I had known that it is preferable to deviate from the book and teach material in an order that makes more sense rather than going lock-step section by section.

       In those nervous first few years we follow the book (if we have one) because it is our lifeline.  It is what tells us where to head next and saves our sanity when we are completely overwhelmed and cannot think of one more thing before we crash from exhaustion.  So we do section 1.1, 1.2, 1.3, quiz (because they book says one should fall there), 1.4....until we get through the book.  We don't realize (often because no one tells us or we are too tired to ask) that it is only a guide, not a curriculum.  I know that for years I followed it because it was all that I had.  My notes were even labeled "1.1 Title of Section".  I look back on those days and realize that while I was teaching, I was not reaching.  I was covering every topic that was on my list and getting through the whole book (most years anyway) which was seen as a win!  I was so nervous and so anxious about keeping my room quiet and under control (see pitfall one here) that I never asked myself "are they learning"?

      One day, however, as I got over my nerves, I started to realize that the ideas were so choppy and segmented that the students were struggling to make connections.  I started examining the content and not the book and came to some realizations.  I realized that there were triangles in chapters 1, 4, 7 and 9 so why not just do a unit on triangles?  Why not rearrange the order of topics so that they flow together instead of battling with each other?  I sat down and started mapping out topics and identifying what went with what and what was foundational information versus what was the next level.  Ultimately I started rearranging my entire outlook to meet the needs of the students (while still covering the curriculum).

      When I started doing this, my whole classroom changed, improved and strangely enough, I felt like a better teacher!  I felt like I was actually in control of what my students were learning and had some autonomy to try new things.  My passion for teaching was reenergized because I was again enjoying what I was doing.  Best of all - my students were happier, learning and retaining better and more effectively engaged!

I spoke with a few other teacher-authors about how they broke away from the textbook:


History Gal shared that "history's sequencing is chronological so it is difficult to deviate too much. However, as the teacher, I can decide how much to spend on each unit. This might surprise you, but there are parts of history that are boring even to history teachers! I cover those time periods quickly and spend more time on parts of history that I enjoy.

Coach Christopher from Courage To Core  shared "I like to switch things up every few years and teach at a new school, or quit and go rock climb for a year to keep things fresh. On the other hand, one way to keep some continuity for me has been to craft my own teaching materials to go alongside the school’s preferred text. The materials were adapted, refined and expanded with each new school. After 15 years (!) the texts became ancillary to my own materials which are now under the moniker Courage To Core. The evolution continues. No lock-step allowed!"


The pitfalls are there, just waiting, but hopefully together we can navigate them, avoid them or capitalize upon them to the benefit of you and your students.  How did you learn to break away from the books sequencing to using your own?  Comment below, I'd love to hear it!


Monday, October 12, 2015

Avoiding the Pitfalls of Teaching # 1 - Talking To Your Students Instead of At Them


Although  as teachers we spend many years in college learning our subject area and in teacher education classes, nothing - not even student teaching - can fully prepare you for the day that you walk into a school and have your own classroom.  Suddenly that's it.  You are in front of a room of 25 - 35 students all of whom you need to educate, engage and manage.  Unfortunately, unless you have a fantastic support system, you are likely to commit some of the common pitfalls that can make your job that much harder.  Over the next few weeks I am going to address some of these pitfalls and how to avoid them!  Additionally, I have asked some of my friends at teacherspayteachers to contribute their knowledge as well!


Topic One:  How to Talk TO your students (i.e. facilitating a discussion) instead of AT them (i.e. lecturing)! 


When we start teaching we are nervous, especially for the first year or two until we get some experience under our belts.  We want everything to go well, we want our rooms to be well managed, we want to be that super fantastic, great, wonderful, perfect teacher whose classroom looks like one of those out of a 1950's sitcom where everything is neat, tidy, with the students all raising their hands. To achieve this lofty "perfect classroom" we walk in, put the hammer down and start talking at our students through the "stand and deliver" lecture method.  We operate under the assumption that if they are silent, they are listening, learning and perfectly "under control".  Yep, sure they are. (Just like when my kids are suddenly quiet at home it means that they are being perfect angels...)   In all reality, 40% of your students are not learning anything because they don't learn that way, 50% are afraid to ask a question (or robbed of the opportunity to do so because you never pause) and 80% are about to explode from the amount of words and energy that is building up.
   
No one can sit still, silently for 45 - 60 minutes.  I know that I sure can't.  I get antsy, I start to tune out the words around me, I doddle, I start making lists, I get BORED!  Do we honestly expect our pre-teens and teens to be any different?  At the age we are when we become teachers we've learned some of the social norms, we know how to stay in our seats and at least look tuned in.  Most of the students sitting in front of us don't.  They are in ever changing bodies in an ever changing world trying to balance school, families, sports/clubs, friends, hormones and a thousand other things.  When you are trying to compete with all of that you need to teach how they learn.

So how do you do that?  How do you teach the way they learn?  Simple - you talk with them, not at them.  You allow your students to feel that they have a stake in their learning process and the ebb and flow of the classroom.

  • **  To combat their need to talk you can give them quick breaks where you say "solve this question with someone sitting next to you" or have a quick class discussion about how they see the topic (when applicable) used in the "real world".  
  • **  To combat their need to move ask students to come to the board to solve a problem or have them do a quick "think, pair, share".  
  • ** To keep them engage you can ask "what questions do you have" instead of "does anyone have any questions"?  Ask a student to explain what you just taught in their own words.  

In other words, you involve them in the lesson which gives them the opportunity to burn off some energy and raises engagement rates.  (I talk more about effective questioning here). You talk TO them and listen when they respond back.   If you ask them a question, listen, ask more questions to draw out more information, ask other students if they agree, disagree or have something to add.  You don't want to get them talking, engaging and interested to then just shut them out by not giving their responses any credence.

I spoke with a few other teacher-authors about how they made this shift:


Nikki from Teaching Autism found success when she formed relationships and explored other methods: "For me, it's very different, 99% of our children are non verbal, meaning it's very easy to talk at them rather than with them. It's great to offer choices so that they are independently making choices with you, using prompt cards (http://bit.ly/1M85eyw) to stir up a conversation - use iPad apps such as proloquo or symbol/communication books (http://bit.ly/1hhE93w) so that they are able to answer you, get them to point to an answer when you have offered them a choice. 

At first, it can be so hard, how do you make conversation with a non verbal child? It's something that doesn't come to you at first, so don't feel deflated when you feel like you're failing. It's something that definitely grows with you as your experience does. The more you learn about the children, the more you're able to talk with them, look for different signs of communication and promote communication that they look forward to. It's through this, that you start to build strong and professional relationships with your students. Once you have that strong relationship, then you're ready to tackle the teaching world!"


Coach Christopher from Courage To Core shared that the shift happens when you engage the students strengths: "For some years I worked at the amazing Archer School for Girls in Los Angeles, a city where social capital is the subtext for almost every text, where all Instagram’s are about to go viral, and face to face interactions can feel a little like being added to someone’s LinkedIn network. The Archer girls spoke in emoji’s or hashtags or something—codes conveyed in a blink of an eye, because they knew each other and were utterly in their domain at Archer. In class they lunged to answer questions, to hear their voices and those of their peers, and it was a shame not to leverage their social skills to educational ends. When I transitioned primarily to group work in math class, it was as if they had been holding their breaths for a month, waiting to engage full-throated. It was a viral sensation."


It's Kinder Time feels that the shift happens when you make a connection: "I believe that the many years I spent in the city recreation program for children helped me learn how to have conversations with kiddos rather then talk at them. Over time I learned better ways to make connections. Finding out your students interests really helps make connection with them and can open many doors with parents once they see how much you really care."


The pitfalls are there, just waiting, but hopefully together we can navigate them, avoid them or capitalize upon them to the benefit of you and your students.  How did you learn to talk TO your students instead of AT them?  Comment below, I'd love to hear it!
Related Posts Plugin for WordPress, Blogger...