
The walls of many classrooms at the secondary level (especially the higher you go in math classes) are quite bare. Not all of them, some of them are quite well decorated with useful information but many are just bare concrete blocks. The reasons for this are multiple.
1) Your curriculum changes so much over the year (I do 10 units in 26 weeks) that you would be
constantly needing to change them (and who has the time).
2) We are trying to prepare students for college where most of the walls are quite bare.
3) There is a severe lack of quality resources or posters to put up on your walls.
It is this third reason that I got in touch with my creative side this past year! I had posters that after 15 years were worn out and to be quite honest, no longer reflected the CCSS rearrangement of topics! I had rearranged my curriculum so much that nothing "fit" what I was covering in the groupings that I was covering them. As I started illustrating our units as we did I found some results that while they shouldn't have surprised me, they did.
1) I heard more mathematical conversations between students. They were referencing the posters that I put up on my walls to help each other and were using the terminology correctly!
2) They understood the topics more clearly because the concepts were illustrated with their properties right there on the same sheet of card stock.
3) They were retaining the connection between topics and units longer because I left the posters up for the entire trimester. They were continually seeing the ideas/concepts/definitions as we moved from one unit to the next.
4) Students grades showed a rise - not as much as I would have liked to be honest, but sometimes you take what you can get!
At the end of the trimester I noticed students referencing the posters as they worked on the review and made note cards. I even had multiple students ask if they could take pictures so that they could reference them at home for study.
I have illustrated this post with a few sets that I made (many more are available in my store). They were quick and (mostly) easy to make! Here is how I did it.
1) I used PowerPoint as it allows the best way to layer the concepts, diagrams, labels far better than any other program I have found.
2) I made a list of the all of the terms/concepts that I wanted to include before I started so that I didn't forget anything. I designed each set of posters to be a unit of study.
3) I made a basic layout for the slides so that they all "matched" in that they used the same font,
borders, style.
4) I made sure to include all of the necessary information but did not make the slides so "busy" that they were overwhelming.
5) Once I had them done, I printed them on cardstock and laminated them so that they would last! I chose to do it on colored cardstock to save on ink and to make them eye-catching.
However you choose to do it by either making them yourself or buying some that are already made, I highly encourage you to do it! I have found nothing but positives from using Word Walls/Concepts Posters. I am looking forward to seeing the results when I start with them from day 1 of the new school year instead of waiting for the second trimester like I did this year. I am working hard to create some that I can use for the first half of my curriculum and look forward to testing the results!
Click here to download a sample of my Geometry "A" Poster Bundle.

1) Your curriculum changes so much over the year (I do 10 units in 26 weeks) that you would be
 |
| Surface Area/Volume Wall Posters |
2) We are trying to prepare students for college where most of the walls are quite bare.
3) There is a severe lack of quality resources or posters to put up on your walls.
It is this third reason that I got in touch with my creative side this past year! I had posters that after 15 years were worn out and to be quite honest, no longer reflected the CCSS rearrangement of topics! I had rearranged my curriculum so much that nothing "fit" what I was covering in the groupings that I was covering them. As I started illustrating our units as we did I found some results that while they shouldn't have surprised me, they did.
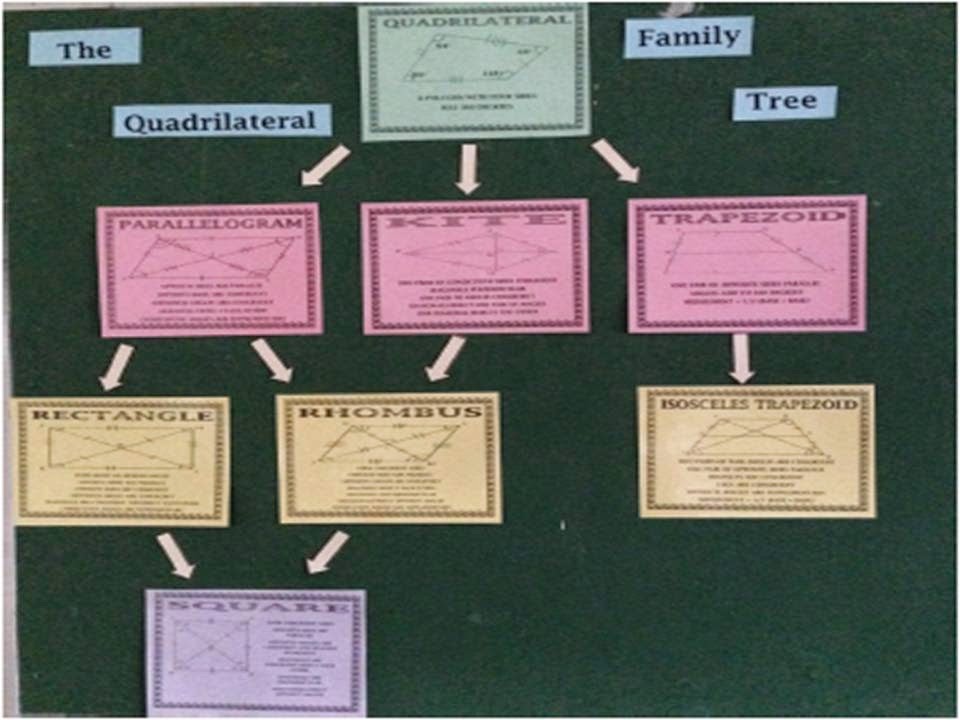 |
| Quadrilaterals Wall Posters |
2) They understood the topics more clearly because the concepts were illustrated with their properties right there on the same sheet of card stock.
 |
| Area Formulas Wall Posters |
3) They were retaining the connection between topics and units longer because I left the posters up for the entire trimester. They were continually seeing the ideas/concepts/definitions as we moved from one unit to the next.
4) Students grades showed a rise - not as much as I would have liked to be honest, but sometimes you take what you can get!
 |
| Right Triangles Wall Posters |
At the end of the trimester I noticed students referencing the posters as they worked on the review and made note cards. I even had multiple students ask if they could take pictures so that they could reference them at home for study.
I have illustrated this post with a few sets that I made (many more are available in my store). They were quick and (mostly) easy to make! Here is how I did it.
1) I used PowerPoint as it allows the best way to layer the concepts, diagrams, labels far better than any other program I have found.
2) I made a list of the all of the terms/concepts that I wanted to include before I started so that I didn't forget anything. I designed each set of posters to be a unit of study.
3) I made a basic layout for the slides so that they all "matched" in that they used the same font,
| Transformations Wall Posters |
4) I made sure to include all of the necessary information but did not make the slides so "busy" that they were overwhelming.
5) Once I had them done, I printed them on cardstock and laminated them so that they would last! I chose to do it on colored cardstock to save on ink and to make them eye-catching.
However you choose to do it by either making them yourself or buying some that are already made, I highly encourage you to do it! I have found nothing but positives from using Word Walls/Concepts Posters. I am looking forward to seeing the results when I start with them from day 1 of the new school year instead of waiting for the second trimester like I did this year. I am working hard to create some that I can use for the first half of my curriculum and look forward to testing the results!
Click here to download a sample of my Geometry "A" Poster Bundle.


